Configuring Server Storages (Admin Only) |
  
|
Configuring Server Storages (Admin Only) |
|
Nx Witness provides an easy and flexible storage management policy. Each Server can use unlimited number of local and network Storages. If more than one Storage is used, Server will automatically balance the space consumption. The more free space the storage has, the higher the usage intensity will be.
Storage is considered to be a separate hard disk partition. If a partition has more than 100 Gb of free space, Nx Witness uses it automatically.
Additionally it is possible to add network storages.
To configure Server Storages:
1.Open the Server Settings.
2.Go to Storages:
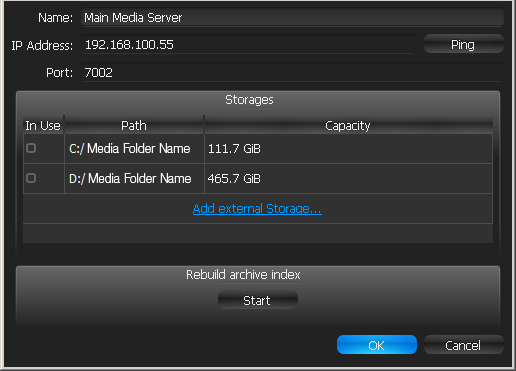
As displayed above, the computer has 2 partitions and only disk D is used for storage because disk C has less than 100 Gb of free space.
3.To select Storage to be used check In Use flag
4.To add NAS/External Storage (Windows only), click Add and enter the storage Samba path (URL), Login and Password.
![]() IMPORTANT. On Linux the most convenient way is to mount it as local disk (via Samba/cifs).
IMPORTANT. On Linux the most convenient way is to mount it as local disk (via Samba/cifs).
5.Click OK. At this point, all Storages will be checked for validity and ability to write to. If the drive has insufficient space, a warning will appear.
The Storage structure on the partition is as follows: <drive>/Nx Witness Media/$Resolution/$MAC/$YYYY/$MM/$DD/$HH:
•$Resolution:
•hi_quality – full resolution streams
•lo_quality – low resolution streams
•$MAC – MAC address of the recorded device
•$YYYY – Recorded Year
•$MM – Recorded Month
•$DD – Day
•$HH – Hour
![]() IMPORTANT. 5 GB of free space is always preserved on Storage.
IMPORTANT. 5 GB of free space is always preserved on Storage.