Setting up Motion Mask and Motion Sensitivity |
  
|
Setting up Motion Mask and Motion Sensitivity |
|
In order to detect motion more properly and accurately, Nx Witness provides a powerful and flexible Motion Detection configuration. For example, if a camera is pointed at a parking lot, motion mask can be set on all the surrounding areas that are not targeted for recording. In this case, any motion appearing in the areas surrounding the main target area, will not trigger motion detection and recording.
![]() IMPORTANT. This particular feature in Nx Witness works only if the selected camera supports Motion Detection.
IMPORTANT. This particular feature in Nx Witness works only if the selected camera supports Motion Detection.
The following Motion Detection types are supported:
•Hardware Motion Detection – implemented on Cameras directly. In this case only motion mask can be configured. To configure additional parameters it may be necessary to go to Camera Settings web page (see "Configuring Proprietary Camera Parameters"). For Arecont Vision this mode is set automatically.
•Software Motion Detection is performed on Server . It consumes more resources, though it provides better and more flexible motion detection. In this case, it is possible to set up unlimited number of motion regions and adjust its sensitivity. Software Motion Detection requires Dual-Streaming supported by Camera. If supported, Software Motion Detection is set automatically (excluding Arecont Vision cameras). If primary stream is 480p or less, it can be used for Software Motion Detection as well.
To set up Motion Detection:
1.Open Camera Settings and go to Motion:
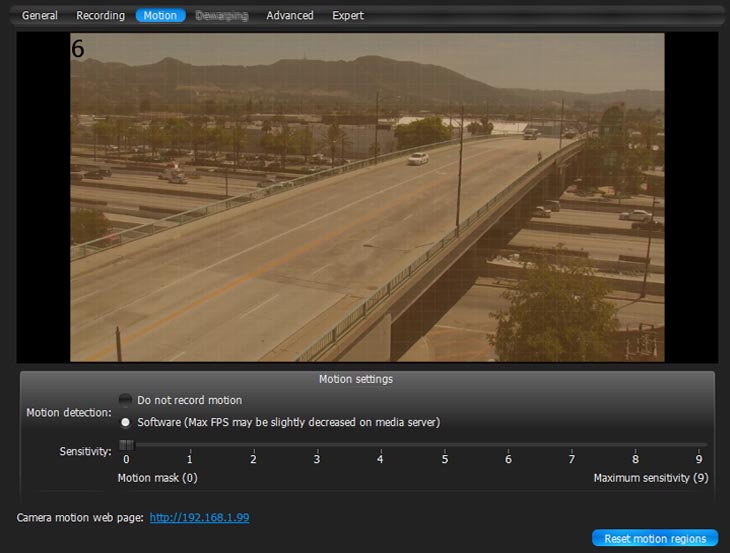
If red zones appear on the grid during motion, Motion Detection is supported. Red cells indicate the level of motion (the higher the motion level, the brighter the cells).
2.Select the type of motion detection (Hardware or Software). If none are active, the camera does not support Motion Detection at all.
3.Select Sensitivity on the slider. 0 is motion mask (minimal sensitivity, motion will not be detected on the selected region); 9 is the highest sensitivity.
4.Select the desired regions the sensitivity will be applied to:
•Click and Drag to select a single region
•Ctrl + Click and Drag to add another region
•Click on a region to fill it with desired sensitivity
To set Motion Mask just Click and Drag. There is no need to adjust Motion Sensitivity.
5.Repeat for each desired sensitivity. Use Reset Motion Regions to start over.
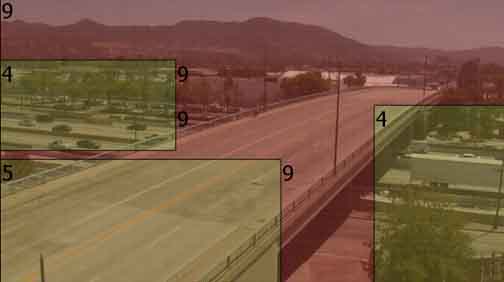
The above picture illustrates the following:
•the area marked in grey will not capture motion (Motion Mask)
•the green area will capture motion with very low sensitivity
•top right and bottom left corners will capture motion with standard sensitivity
•for other regions, the sensitivity will be high.
6.Click Apply or OK when finished. To discard any changes, click Cancel.
It is possible to set up motion directly from camera’s web page. For this purpose, use Camera Motion Web Page link on the Motion tab.