Modifying Recording Schedule |
  
|
Modifying Recording Schedule |
|
Nx Witness provides a powerful and flexible schedule for configuring recording parameters.
A specific date and time can be set in the recording schedule as well.
Examples:
•Workdays 8AM-8PM – record Always, 24 FPS, high quality
•Weekends and Workdays 8PM-8AM – record motion only, 10 fps, low quality
The cameras recorded by Server s are marked with a small red circle in Resource Tree:
![]() – camera in recording mode
– camera in recording mode
![]() – camera recording is setup, though not recording at the moment (a license is still being used)
– camera recording is setup, though not recording at the moment (a license is still being used)
![]() Note: It is possible to configure Cameras for Administrators and Viewers that have appropriate permissions.
Note: It is possible to configure Cameras for Administrators and Viewers that have appropriate permissions.
To set up Recording Schedule:
1.Select the desired Camera(s) in Resource Tree (use SHIFT or CTRL to select several) or on Scene, open Camera Settings and go to Recording:
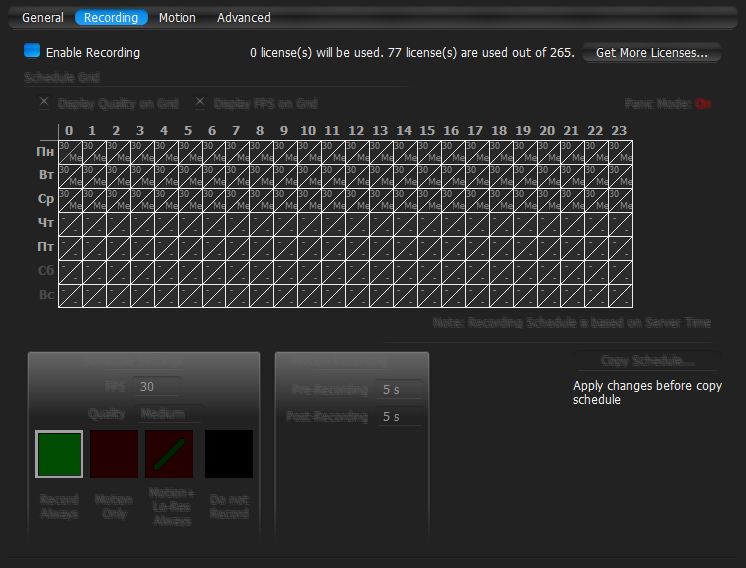
![]() IMPORTANT. If Server and Client are in different time zones the schedile displays Server Time.
IMPORTANT. If Server and Client are in different time zones the schedile displays Server Time.
2.Click Enable Recording. Check the number of licenses used. If the number is insufficient, click Get More Licenses and proceed with activation.
Click on Display FPS on Grid and Display Quality on Grid to show/or hide FPS and quality in grid cells.
3.Select Recording Mode:
•Record Always
•Motion Only – recording will start if motion occurs. To specify a range for motion recording, use Record before motion and Record after motion selectors. Motion detection must be supported by the camera (Software or Hardware).
•Motion + Low Quality Always – low quality stream is recorded always and is switched to high quality streaming once in case of any motion. To use this recording setting, make sure the camera supports dual-streaming.
If not the following will be displayed:

•Do not Record
4.Select Recording Quality
5.Select FPS
![]() IMPORTANT. If making any changes to image parameters for Camera is prohibited for Nx Witness, then FPS and Recording Quality changes will not take effect. See "Preventing Nx Witness from Changing Camera Streaming Settings (Admin Only)" for details.
IMPORTANT. If making any changes to image parameters for Camera is prohibited for Nx Witness, then FPS and Recording Quality changes will not take effect. See "Preventing Nx Witness from Changing Camera Streaming Settings (Admin Only)" for details.
6.As soon as all the parameters are selected, click on Schedule Grid:
•Click and Drag to select multiple cells
•Click on hour to select an entire column
•Click on weekday to select an entire row
•Click Schedule Grid's top left corner to select all cells
Note: to select same values, hold Alt and click on the cell to choose a recording mode, FPS and values.
7.Repeat to set another recording for different cells
8.If Motion Recording is set, it is possible to adjust Pre-recording and Post-Recording intervals (the time range between the start and end of motion recording).
9.Click Apply or OK when finished. To discard changes, click Cancel.
In case of insufficient licenses, the following warning will appear:

Enable Recording flag will be disabled; however, all schedule settings will be saved.
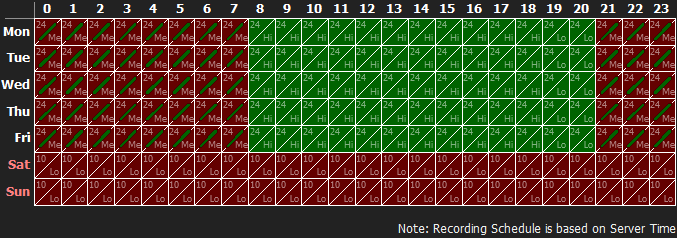
Example:
•Workdays 8AM-8PM – Record Always, 24 FPS, High
•Workdays 8PM-8AM – Motion + Low Quality Always, 24 FPS, Medium
•Weekends – record motion only, 10 fps, Low
![]() IMPORTANT. Make sure to apply all recording selections to the schedule once selected (recording type, FPS and quality). The following message will appear in case the selection is not applied.
IMPORTANT. Make sure to apply all recording selections to the schedule once selected (recording type, FPS and quality). The following message will appear in case the selection is not applied.
